Wednesday, February 25, 2026

Network Security Phase–2: Active Reconnaissance


Tech Guardians – Cyber Range Based Course

Network Security Phase–2: Active Reconnaissance

Passive reconnaissance builds awareness without touching the target. The next stage — active reconnaissance — involves direct interaction with systems to identify network paths, open services, technologies, and system behavior.

Inside the Tech Guardians Cyber Range, students practice these techniques in a controlled environment where learning happens safely, legally, and practically.


๐Ÿ”Ž What is Active Reconnaissance?

Active reconnaissance requires making a connection to the target system. This interaction may be:

  • Visiting a website

  • Checking open ports

  • Sending network packets

  • Connecting to services such as SSH, HTTP, or SMTP

Because direct contact is made, logs can record:

  • Client IP

  • Connection time

  • Duration

  • Requested resources

Therefore, active reconnaissance must only be performed with proper authorization.
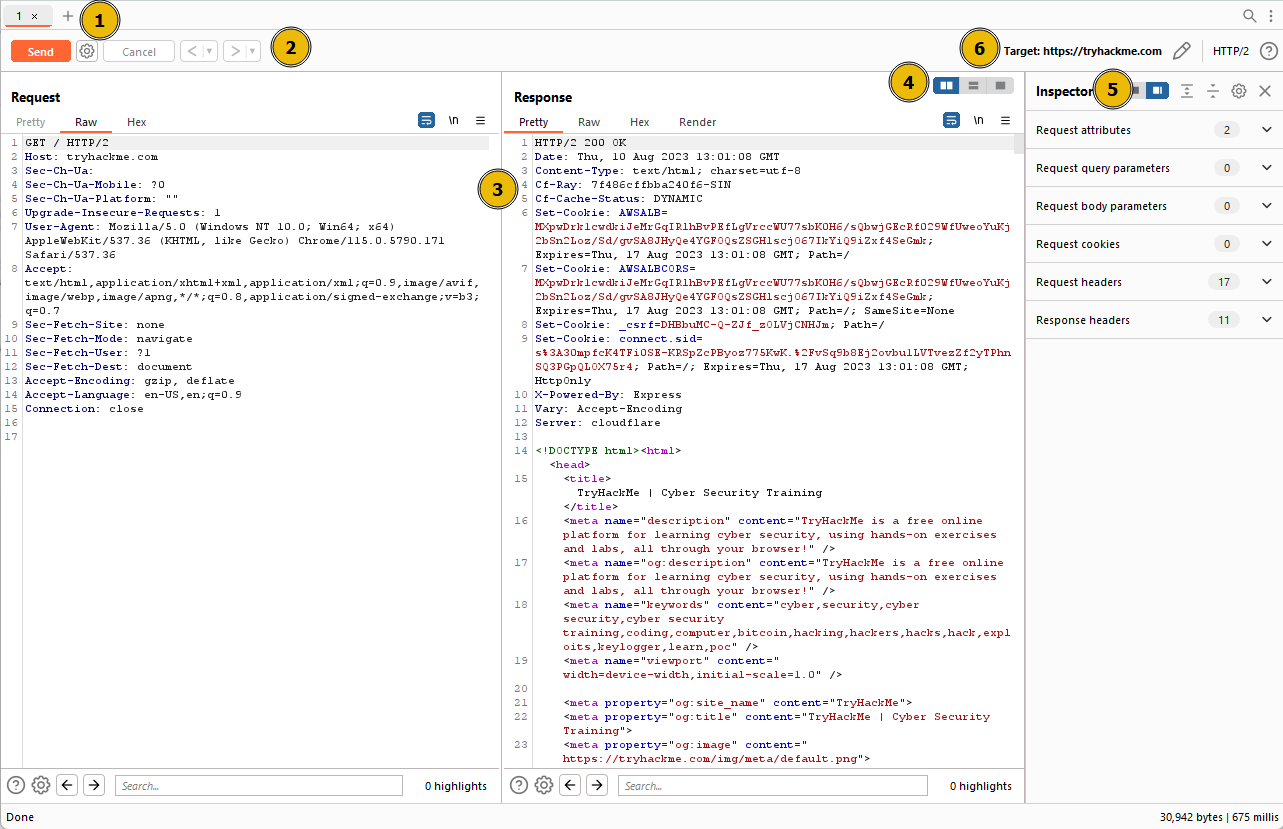

๐ŸŒ Web Browser as a Reconnaissance Tool

Image

Image

Image

Image

A web browser is one of the most powerful reconnaissance tools available on every system.

Key Capabilities

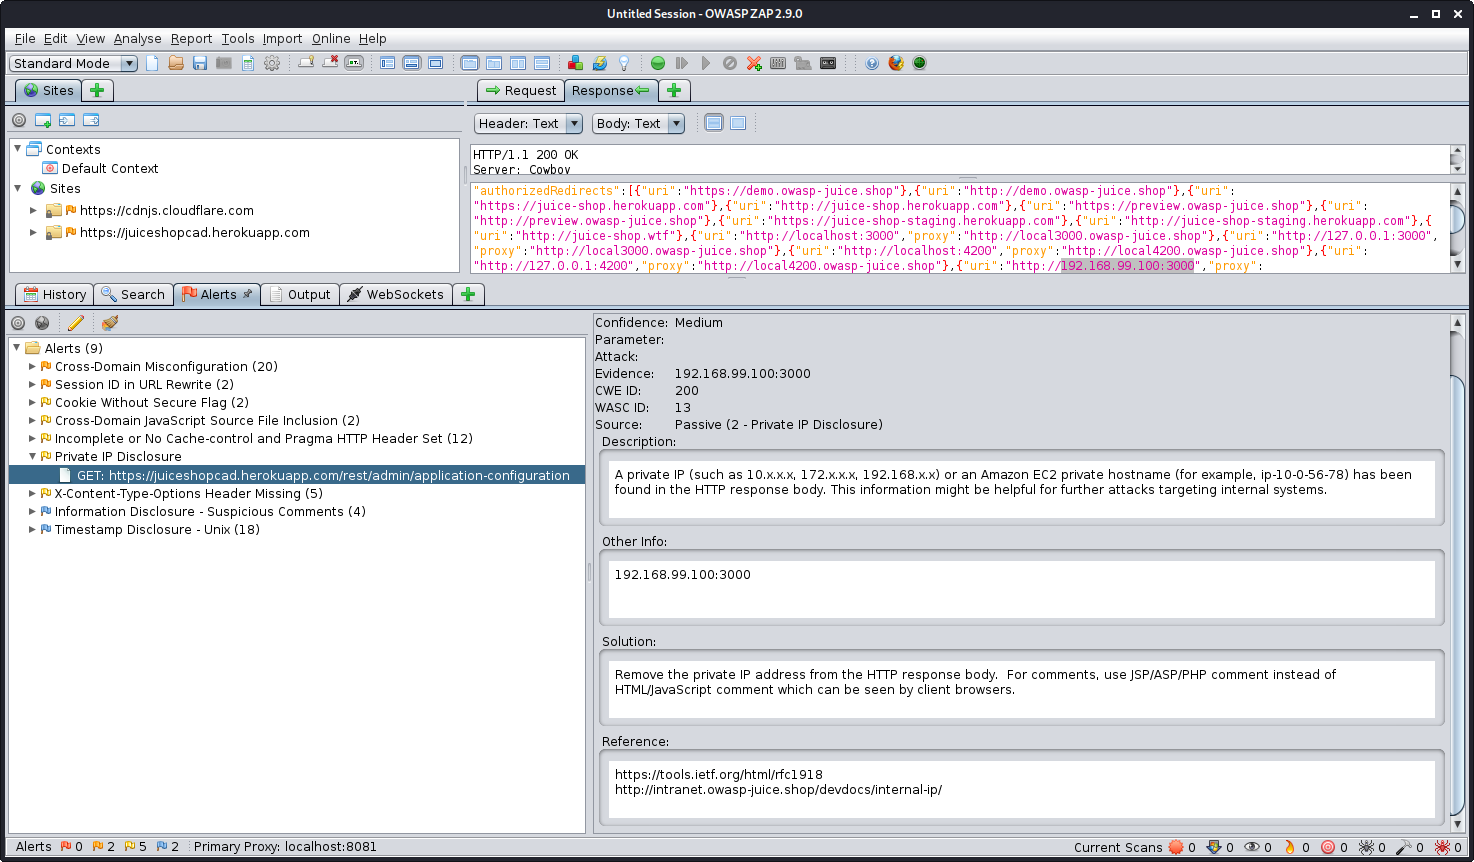
  • Inspect page source and JavaScript

  • View cookies and session data

  • Discover site structure

  • Identify backend technologies
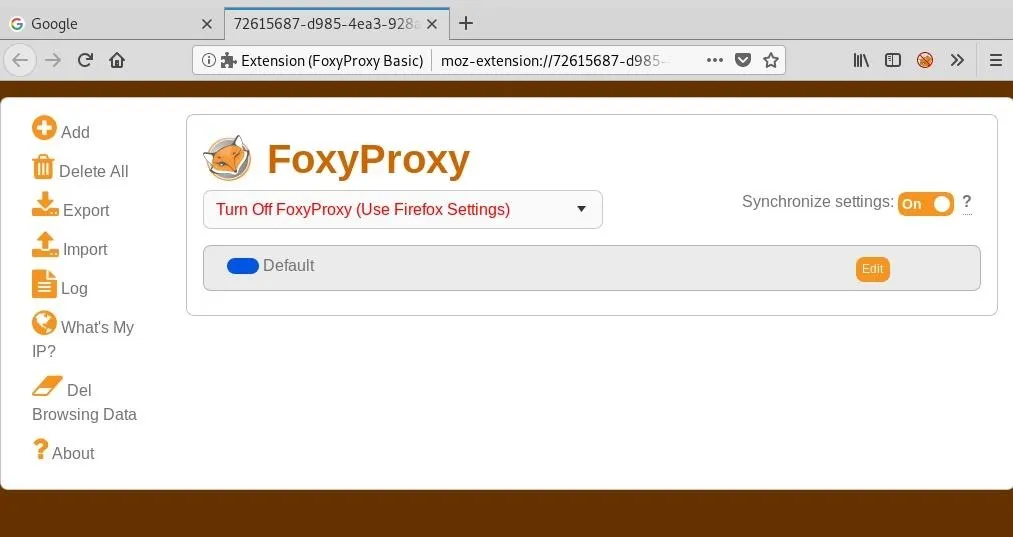
Useful Extensions

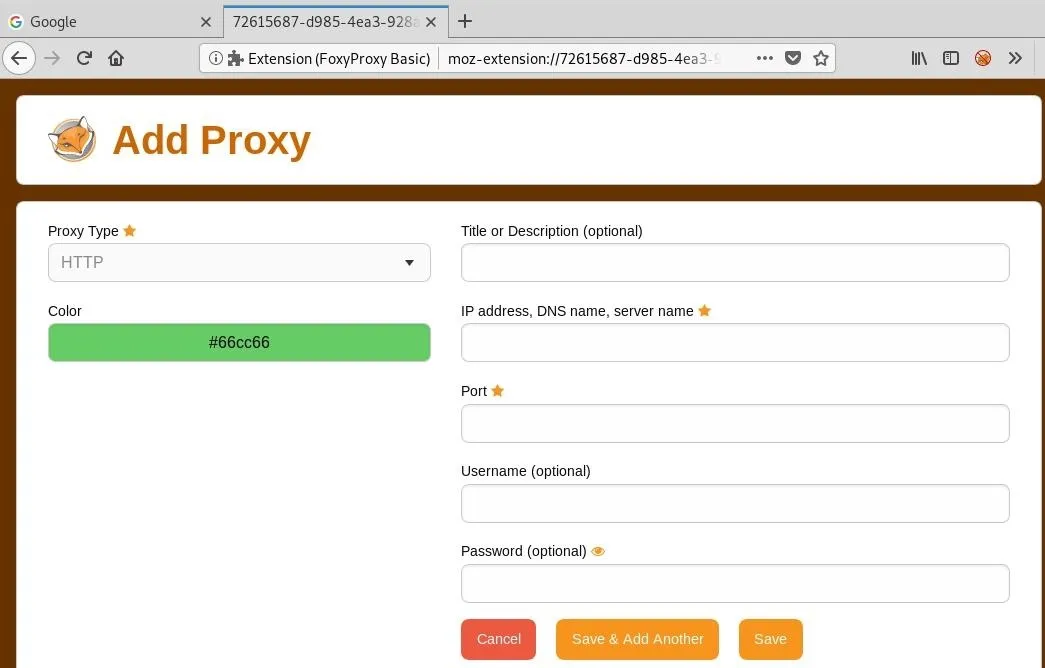
  • FoxyProxy → quick proxy switching (Burp Suite workflows)

  • User-Agent Switcher → simulate different devices and browsers

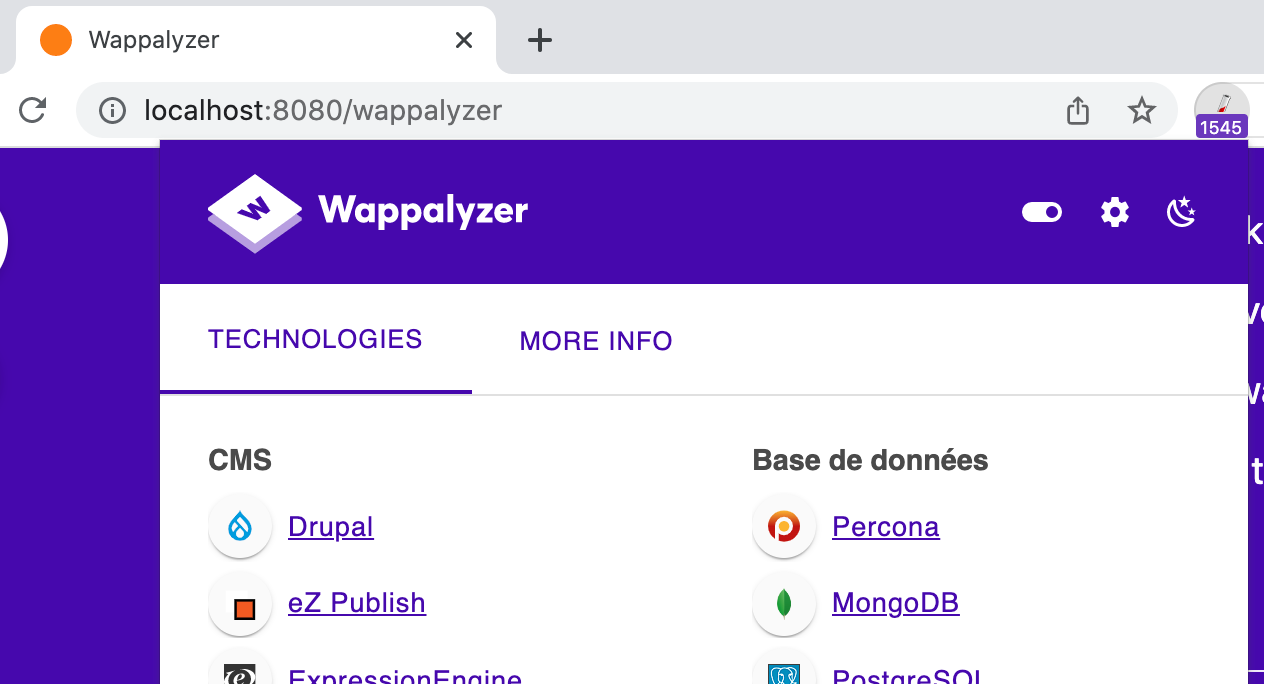
  • Wappalyzer → detect frameworks, servers, CMS, analytics

Default Transport Ports

  • HTTP → TCP 80

  • HTTPS → TCP 443

Custom ports can be accessed using:

https://IP:PORT

๐Ÿ“ก Ping — Checking System Availability

Image

Image

Image

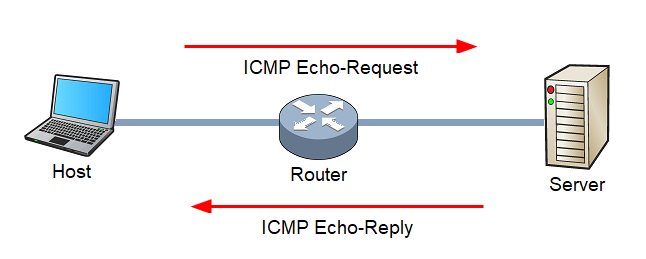
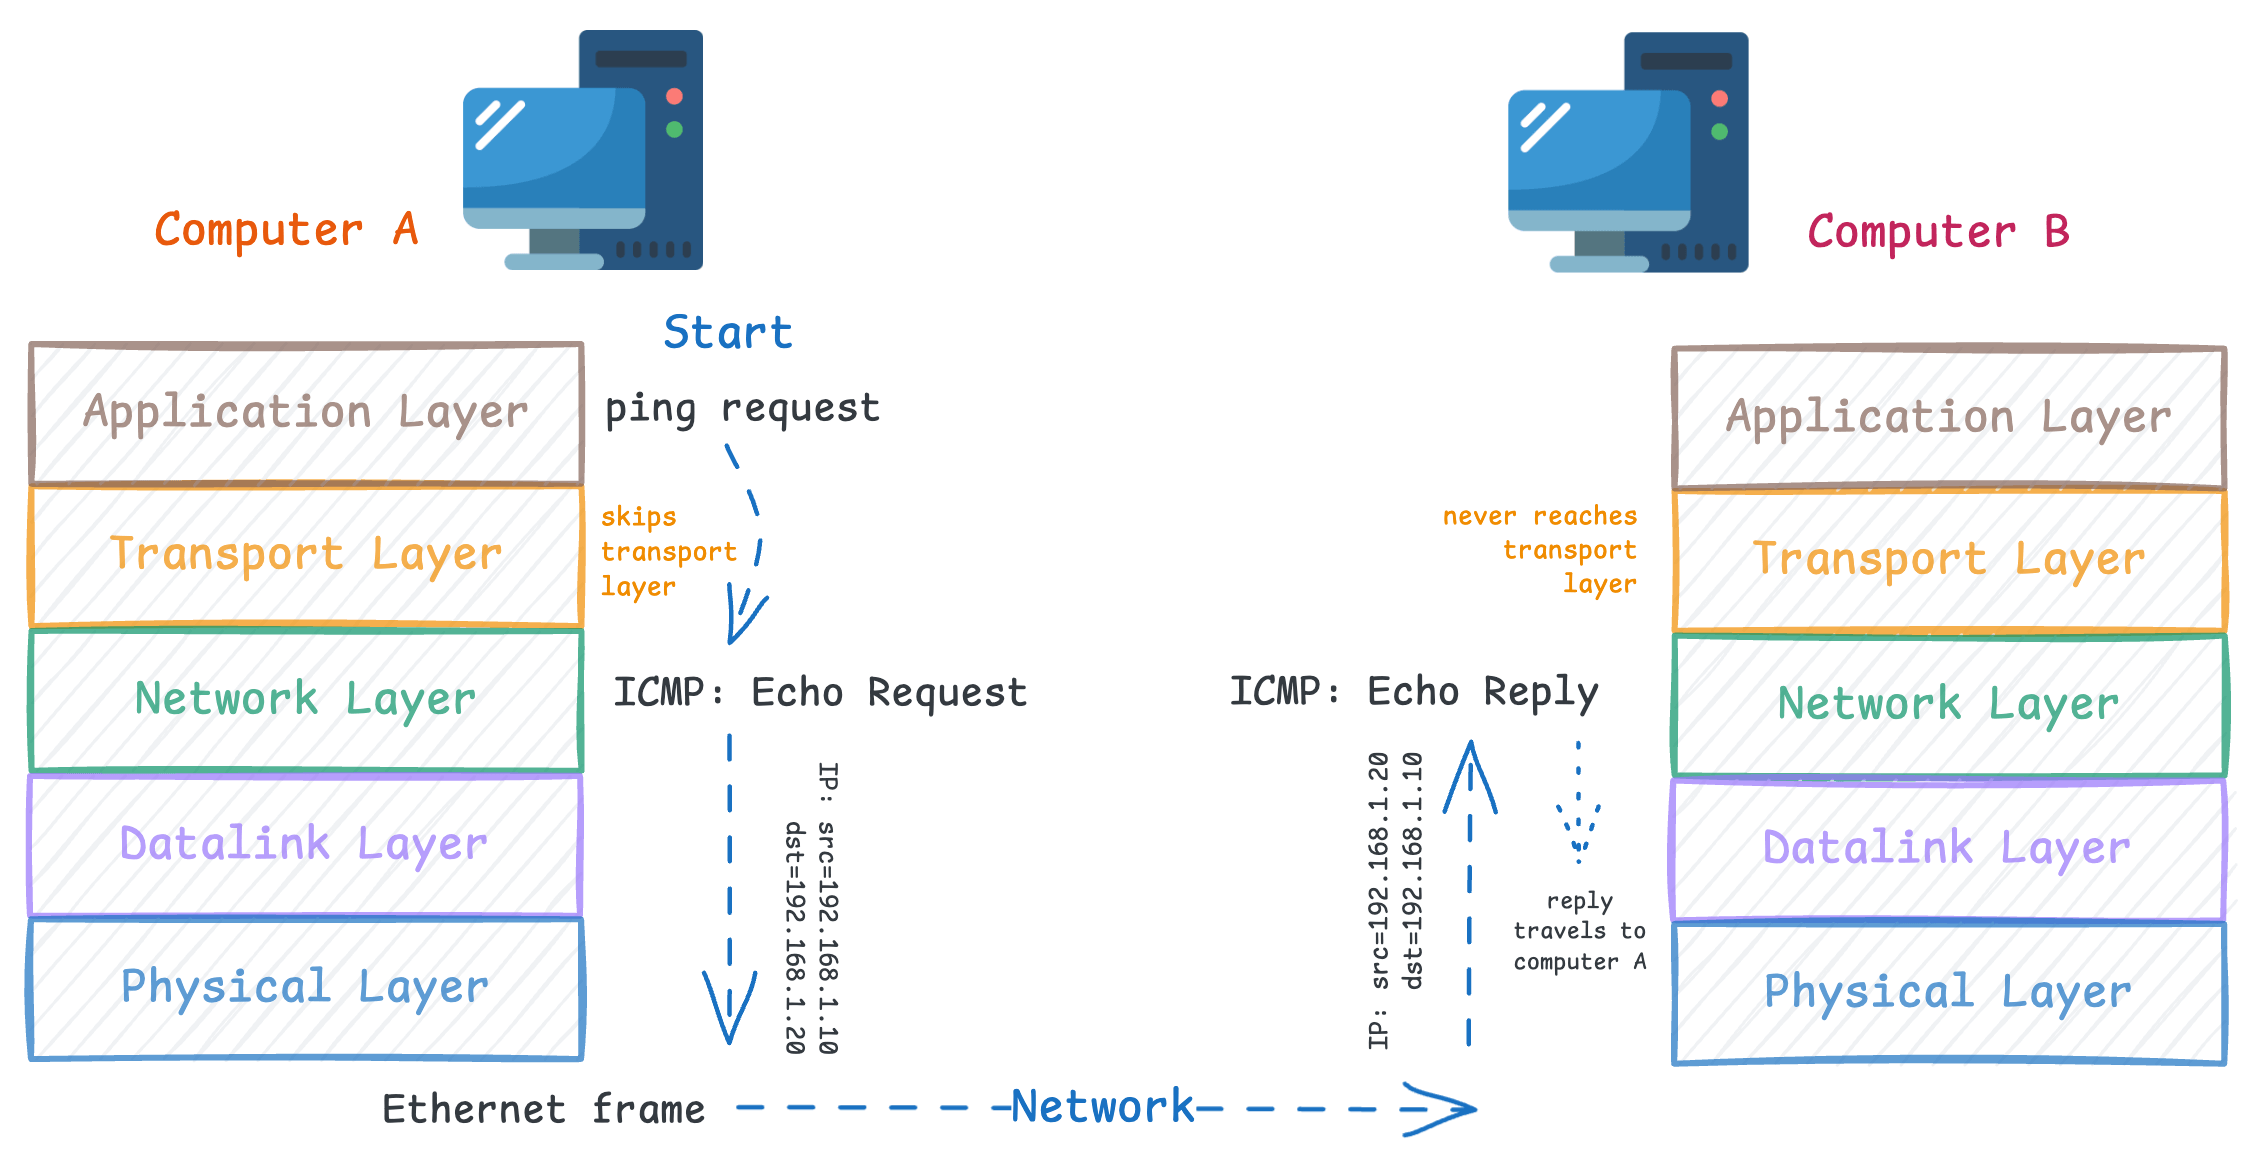
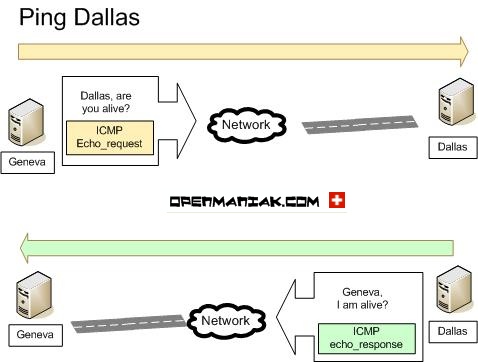
Ping verifies whether a system is online by sending an ICMP Echo Request and waiting for an Echo Reply.

Uses

  • Confirm host availability

  • Measure latency

  • Check network path reliability

Example

Linux:

ping -c 5 MACHINE_IP

Important Concepts

  • Uses ICMP protocol

  • ICMP header size → 8 bytes

  • Windows Firewall blocks ping by default

Possible reasons for no response:

  • System offline

  • Network issue

  • Firewall blocking ICMP


๐Ÿ›ฐ Traceroute — Mapping Network Path

Image

Image

Image


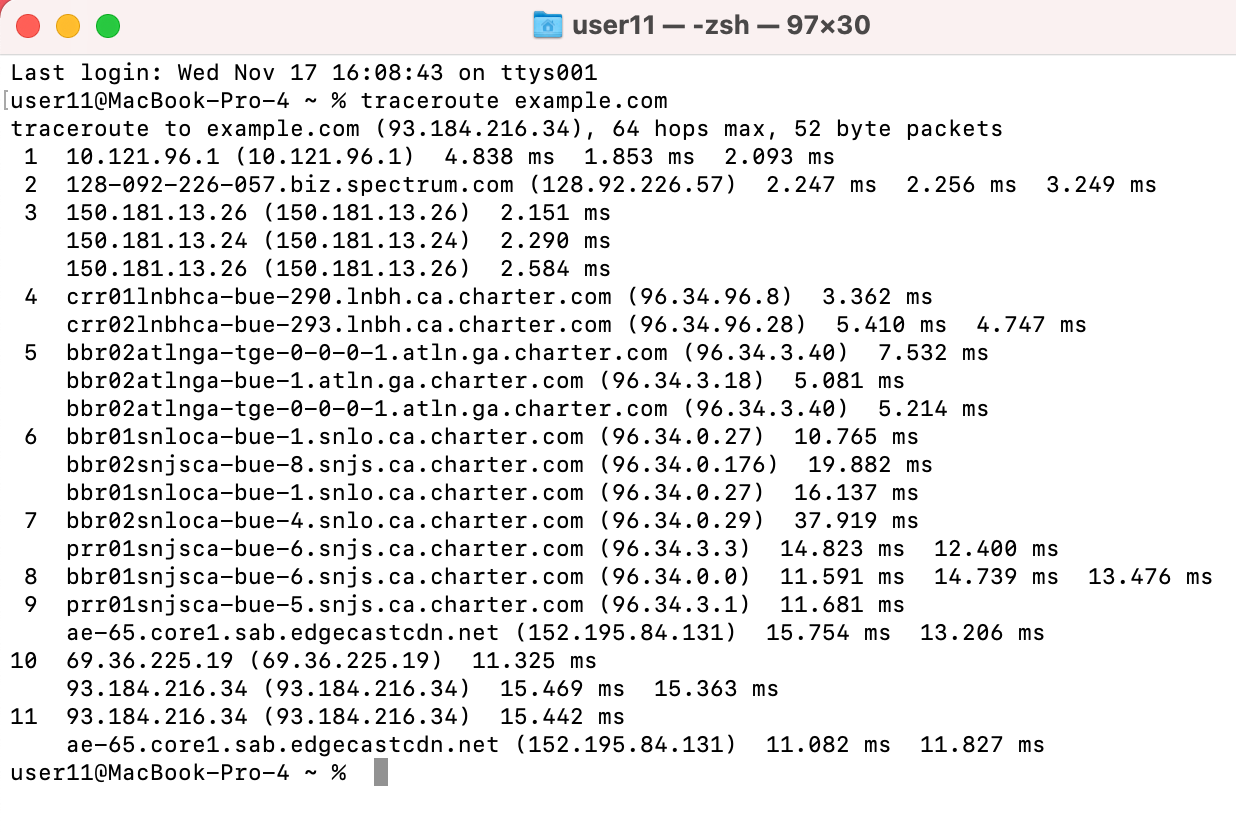
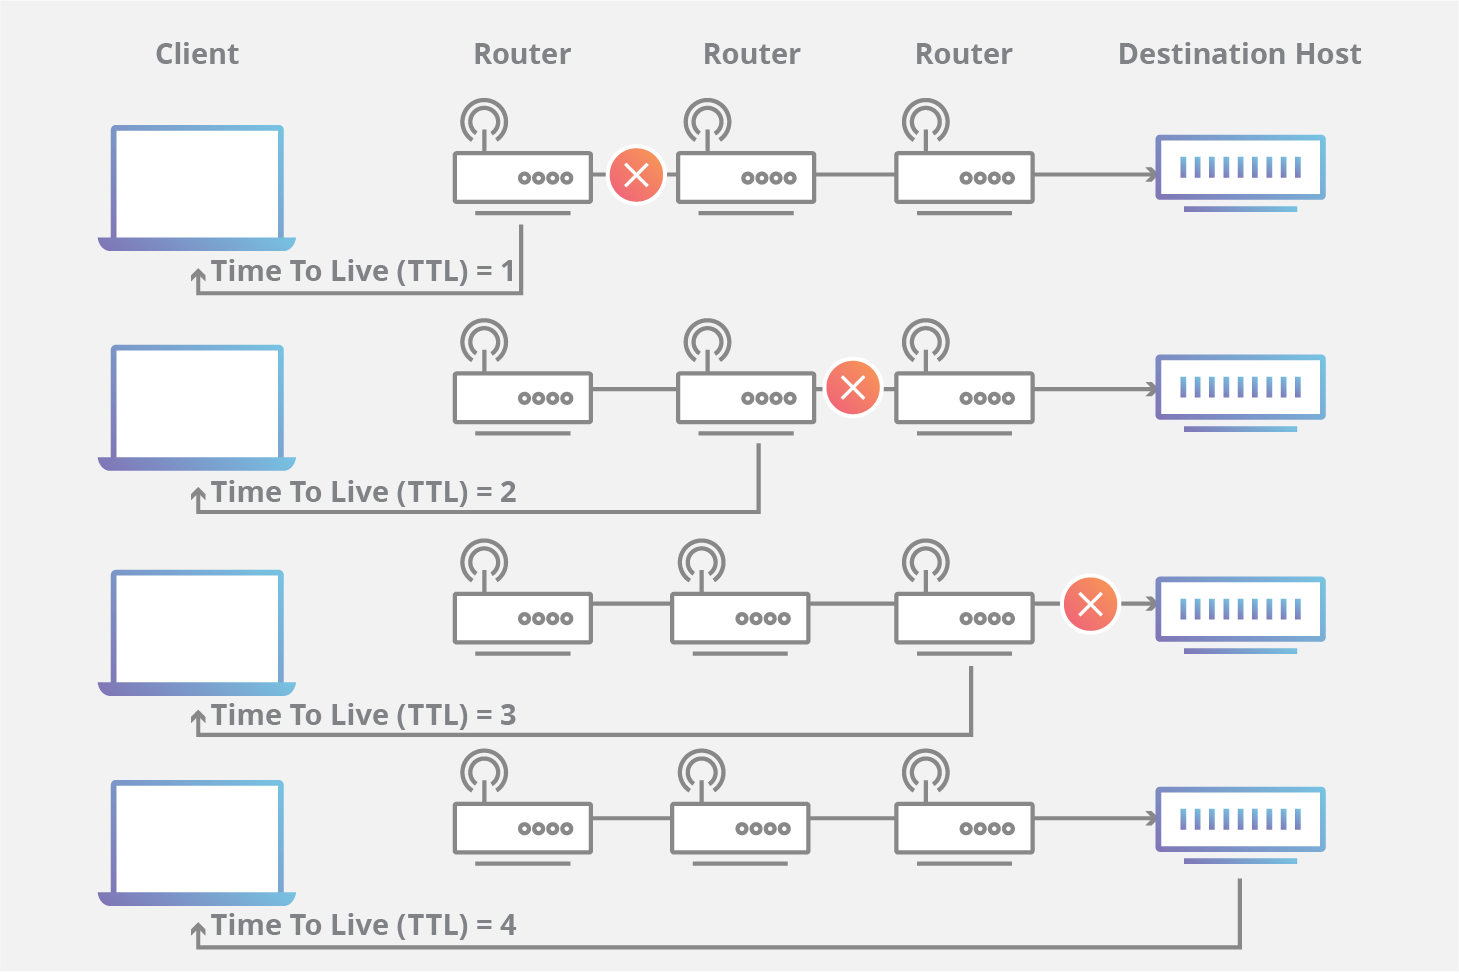
Traceroute reveals the routers (hops) between your system and the target.

It works by manipulating TTL (Time To Live) values to force routers to respond with ICMP messages.
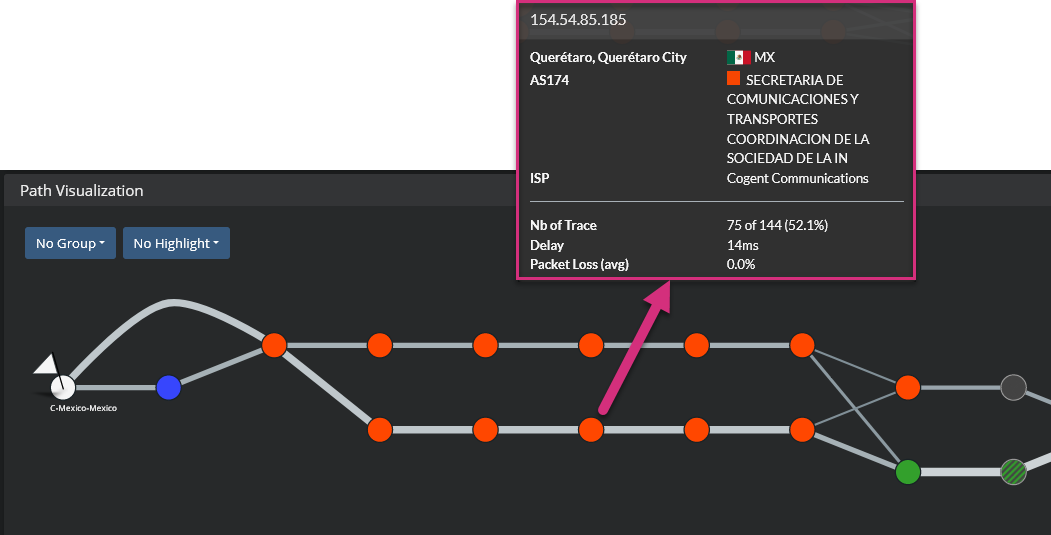
What It Shows

  • Number of routers

  • Network latency per hop

  • Route changes over time

Commands

Linux/macOS:

traceroute MACHINE_IP

Windows:

tracert MACHINE_IP

Key Insight: Internet routes are dynamic, so results may vary.


๐Ÿ’ป Telnet — Banner Grabbing and Service Testing

Image

Image

Image

Image

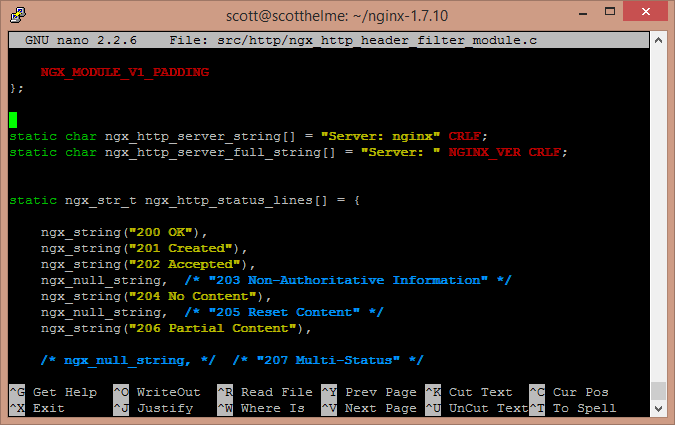
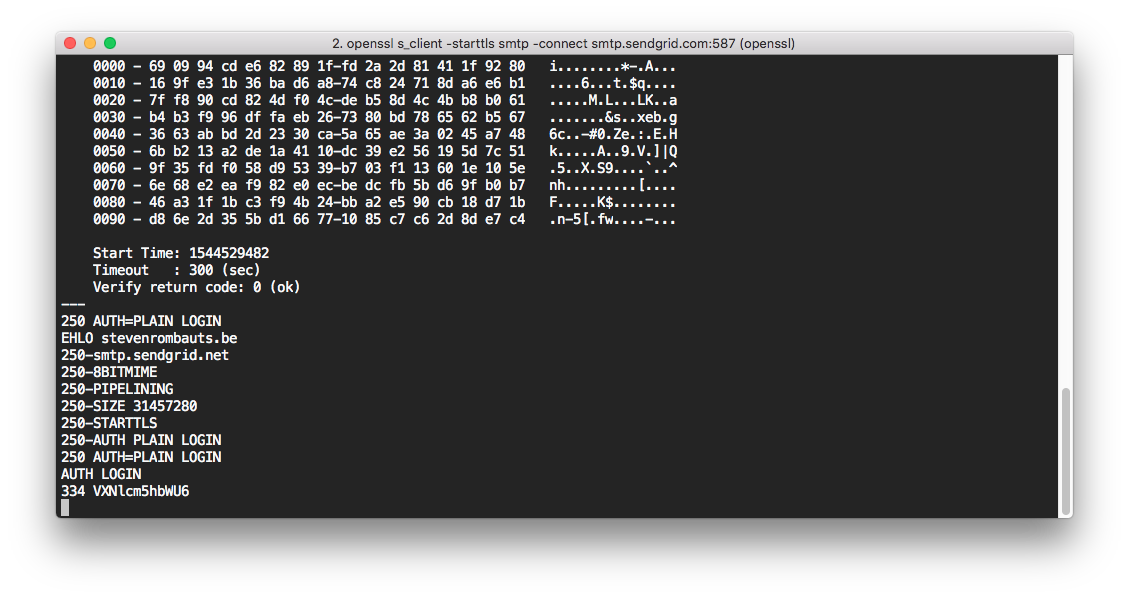
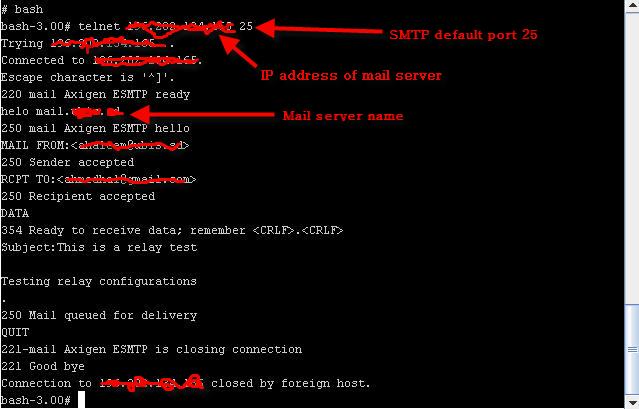
Telnet is an old remote administration protocol (port 23) that transmits data in plaintext. Although insecure for login, it is valuable for reconnaissance.

Uses

  • Connect to any TCP port

  • Grab service banners

  • Identify server type and version

Example:

telnet MACHINE_IP 80
GET / HTTP/1.1
host: test

This may reveal:

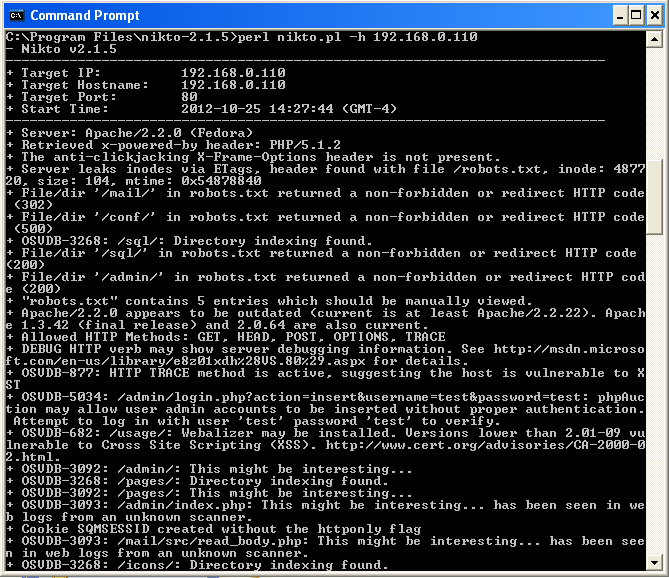
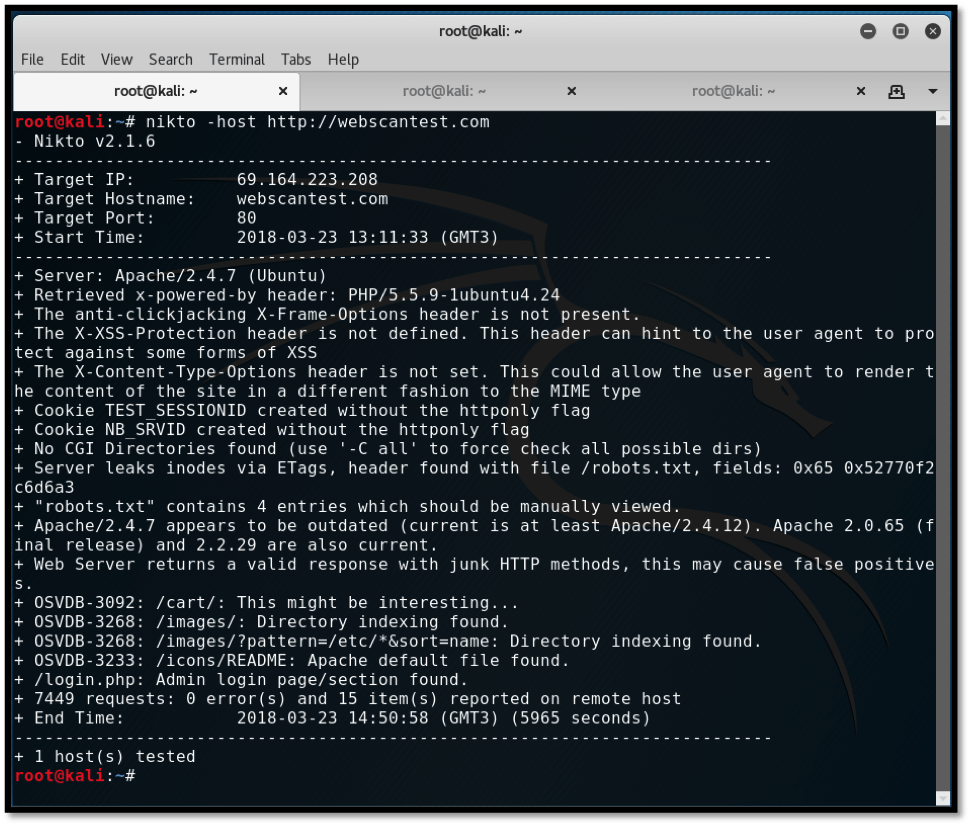
Server: Apache / Nginx

⚡ Netcat (nc) — The Swiss Army Knife

Image

Image


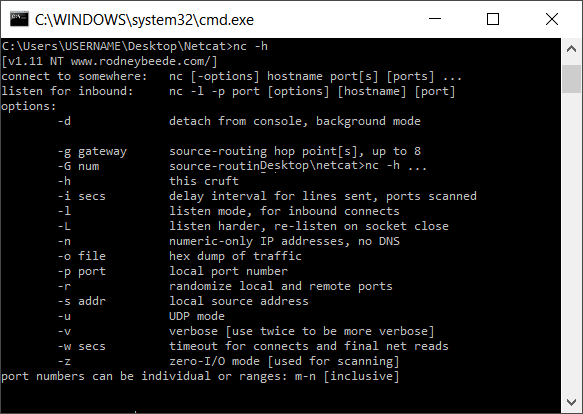
Netcat supports TCP and UDP and can act as both client and server.

Capabilities

  • Banner grabbing

  • Port connectivity testing

  • File transfer

  • Reverse shells

  • Simple chat channels

Example — Client

nc MACHINE_IP 80

Example — Server

nc -lvnp 1234

Common Options:

OptionMeaning
-lListen mode
-pSpecify port
-nNo DNS lookup
-vVerbose
-kKeep listening

๐Ÿง  Combining Tools for Recon Workflow

Basic scanning workflow:

  1. Ping → Check if host is alive

  2. Traceroute → Map network path

  3. Telnet / Netcat → Identify open ports and services

  4. Browser DevTools → Detect web technologies

Professional scanners like Nmap automate this process — covered in later course modules.


๐ŸŽฏ Learning Outcome in Tech Guardians Cyber Range

Students learn:

  • Real-world recon methodology

  • Safe testing inside isolated labs

  • Tool chaining and automation basics

  • How attackers gather intelligence

  • How defenders detect recon activity

Tuesday, February 24, 2026

Digital Forensics in Kali Linux – Tools and Investigation Overview


Digital Forensics in Kali Linux – Tools and Investigation Overview

What is Digital Forensics?

Digital Forensics is the process of identifying, collecting, preserving, analyzing, and presenting digital evidence from computers, storage devices, and networks.

It is used in:

  • Cybercrime investigations

  • Incident response

  • Data recovery

  • Malware analysis

  • Legal proceedings

In Kali Linux, forensic tools are available under:

Applications → Forensics

These tools help forensic specialists recover and analyze data in a legally sound manner.


Goals of Digital Forensics

  1. Preserve original evidence

  2. Maintain chain of custody

  3. Recover deleted data

  4. Analyze memory and disk artifacts

  5. Generate legally admissible reports


Common Digital Forensics Tools in Kali Linux


1️⃣ Autopsy

About

Autopsy is one of the most widely used digital forensic tools.

It is a graphical interface for The Sleuth Kit and is used by:

  • Law enforcement agencies

  • Judicial investigators

  • Incident response teams


Key Features:

  • Disk image analysis

  • Deleted file recovery

  • Timeline analysis

  • Keyword searching

  • Email extraction

  • Web history recovery


Autopsy Interface

Image

Image

Image

Image


How It Works (Basic Steps)

  1. Create New Case

  2. Add Data Source (Disk Image / Drive)

  3. Select analysis modules

  4. Review extracted artifacts

  5. Generate report

Autopsy is often the first tool used in disk-based forensic investigations.


2️⃣ Binwalk

About

Binwalk is used for analyzing firmware images.

It helps in:

  • Extracting embedded files

  • Reverse engineering firmware

  • Identifying hidden data


Example Usage:

binwalk firmware.bin

To extract contents:

binwalk -e firmware.bin

Commonly used in IoT device investigations.


3️⃣ Galleta

About

Galleta is used to analyze Internet Explorer cookie files.

It helps investigators:

  • Identify browsing behavior

  • Extract timestamps

  • Recover user activity

Used in browser-based forensic investigations.


4️⃣ Hashdeep

About

Hashdeep is used for computing and verifying file hashes.

Hashing ensures:

  • Evidence integrity

  • No tampering

  • Authenticity verification


Example Usage:

hashdeep -r /evidence_folder > hashes.txt

It generates hash values for files recursively.

This is critical in maintaining legal credibility of evidence.


5️⃣ Volafox

About

Volafox is used for analyzing memory dumps from macOS systems.

It helps in:

  • Extracting running processes

  • Identifying malware

  • Analyzing memory artifacts

Primarily used for macOS forensic investigations.


6️⃣ Volatility

About

Volatility is one of the most powerful memory forensic tools.

It analyzes RAM dumps to detect:

  • Running processes

  • Hidden malware

  • Network connections

  • Injected code

  • Rootkits


Example Usage:

volatility -f memory.dmp imageinfo

List processes:

volatility -f memory.dmp --profile=Win7SP1x64 pslist

Memory forensics is crucial because attackers often leave traces in RAM.


Types of Digital Evidence

Digital forensic tools can analyze:

  • Hard disks

  • USB drives

  • SSDs

  • Mobile devices

  • Memory dumps

  • Log files

  • Email archives


Digital Forensics Investigation Workflow

  1. Identify and secure device

  2. Create forensic image (bit-by-bit copy)

  3. Calculate hash value

  4. Analyze using forensic tools

  5. Recover deleted artifacts

  6. Document findings

  7. Prepare forensic report


Real-World Example

In a cybercrime case:

  • A suspect's laptop is seized

  • Forensic image is created

  • Hash value is calculated

  • Autopsy analyzes disk image

  • Volatility analyzes RAM dump

  • Deleted emails and browser history are recovered

  • Evidence is presented in court


Comparison of Forensic Tools

ToolPurposeType
AutopsyDisk analysisGUI
BinwalkFirmware analysisCLI
GalletaCookie analysisCLI
HashdeepHash verificationCLI
VolafoxmacOS memory analysisCLI
VolatilityRAM forensic analysisCLI

Importance of Forensics in Cybersecurity

Digital forensics helps in:

  • Incident response

  • Insider threat investigation

  • Malware analysis

  • Legal compliance

  • Cybercrime prosecution

It bridges cybersecurity and law enforcement.


Legal & Ethical Considerations

Forensic analysis must:

  • Follow proper legal procedures

  • Maintain chain of custody

  • Preserve evidence integrity

  • Avoid evidence contamination

Improper handling can invalidate evidence in court.

Wireless Attacks in Kali Linux – Tools and Security Testing Guide

Wireless Attacks in Kali Linux – Tools and Security Testing Guide

What Are Wireless Attacks?

Wireless attacks target Wi-Fi networks, access points, and wireless clients to identify security weaknesses.

These attacks may include:

  • Wi-Fi password cracking

  • Rogue / Fake access points

  • Man-in-the-Middle (MITM) attacks

  • Packet sniffing

  • Wireless information gathering

In Kali Linux, wireless testing tools are available for security professionals under:

Applications → Wireless Attacks

⚠ These tools must only be used in authorized lab environments.


Common Wireless Attack Techniques

1️⃣ WEP/WPA/WPA2 Cracking
2️⃣ Evil Twin Attack (Fake Access Point)
3️⃣ Deauthentication Attack
4️⃣ Packet Sniffing
5️⃣ Man-in-the-Middle (MITM)
6️⃣ Wireless Reconnaissance


Lab Requirement for Wireless Testing

To perform wireless security testing:

  • Kali Linux machine

  • Wireless adapter supporting Monitor Mode

  • Test router (your own)

  • Isolated lab environment

Check wireless interface:

iwconfig

Enable monitor mode:

airmon-ng start wlan0

1️⃣ Aircrack-ng

About

Aircrack-ng is the most popular wireless security auditing tool suite.

It includes tools for:

  • Packet capture

  • Deauthentication

  • WPA/WPA2 handshake capture

  • Password cracking


Aircrack-ng Workflow

Step 1: Enable Monitor Mode

airmon-ng start wlan0

Step 2: Scan Networks

airodump-ng wlan0mon

Step 3: Capture Handshake

airodump-ng -c 6 --bssid <AP_MAC> -w capture wlan0mon

Step 4: Deauthentication Attack

aireplay-ng --deauth 10 -a <AP_MAC> wlan0mon

Step 5: Crack Password

aircrack-ng capture.cap -w rockyou.txt

Aircrack-ng Example Output

Image

Image

Image

Image


2️⃣ Fern WiFi Cracker

About

Fern Wifi Cracker is a GUI-based wireless cracking tool.

Features:

  • WEP/WPA cracking

  • Automated attack

  • Session hijacking

  • Brute-force & dictionary attacks

Launch:

fern-wifi-cracker

It is beginner-friendly compared to command-line tools.


3️⃣ Kismet

About

Kismet is a wireless network detector and packet sniffer.

It helps in:

  • Wireless reconnaissance

  • Detecting hidden networks

  • Identifying rogue access points

  • Monitoring wireless traffic


Kismet Interface

Image

Image

Image

Image


Launch:

kismet

Kismet is mainly used for passive information gathering.


4️⃣ Ghost Phisher

About

Ghost Phisher is used to create fake access points (Evil Twin attacks).

Capabilities:

  • Fake AP creation

  • DNS spoofing

  • Credential harvesting

  • MITM attacks

Scenario Example:

Victim connects to a fake Wi-Fi hotspot →
Attacker intercepts traffic →
Login credentials may be captured.


5️⃣ Wifite

About

Wifite is an automated wireless auditing tool.

It combines:

  • Aircrack-ng

  • Reaver

  • Handshake capture

  • WPA cracking

Launch:

wifite

Wifite automates:

  • Scanning

  • Handshake capture

  • Deauthentication

  • Password cracking

It is useful for quick lab testing.


Wireless Attack Scenario Example

Evil Twin Attack

  1. Attacker creates fake Wi-Fi named “Free_Public_Wifi”

  2. Victim connects to fake AP

  3. Attacker intercepts traffic

  4. Login credentials may be captured

This is commonly used in:

  • Airport Wi-Fi attacks

  • Coffee shop hotspots

  • Public Wi-Fi environments


Wireless Security Testing Workflow

  1. Enable monitor mode

  2. Scan wireless networks

  3. Identify encryption type

  4. Capture handshake

  5. Attempt password audit

  6. Report vulnerabilities

  7. Recommend security improvements


How to Protect Against Wireless Attacks

To secure Wi-Fi networks:

  • Use WPA3 encryption

  • Disable WPS

  • Use strong passwords

  • Hide management interfaces

  • Enable MAC filtering

  • Monitor rogue access points

  • Avoid connecting to public Wi-Fi


Comparison of Tools

ToolTypePurpose
Aircrack-ngCLIWireless cracking
Fern WiFi CrackerGUIBeginner-friendly cracking
KismetPassive ScannerWireless reconnaissance
Ghost PhisherMITM ToolFake access point
WifiteAutomatedQuick wireless audit

Legal Warning

Wireless attacks must only be performed:

  • In your own lab

  • On your own router

  • With written authorization

Unauthorized Wi-Fi attacks are illegal under cyber laws.

Password Attacks in Kali Linux – Tools and Security Testing Overview


Password Attacks in Kali Linux – Tools and Security Testing Overview

What Are Password Attacks?

Password attacks are techniques used to test the strength of authentication mechanisms by attempting to guess, crack, or brute-force login credentials.

In cybersecurity and penetration testing, password attack tools are used to:

  • Test password complexity

  • Identify weak credentials

  • Audit authentication systems

  • Strengthen security policies

In Kali Linux, these tools are available under:

Applications → Password Attacks


Types of Password Attacks

1️⃣ Brute Force Attack – Trying every possible password combination
2️⃣ Dictionary Attack – Using a predefined wordlist
3️⃣ Hybrid Attack – Combination of dictionary + modifications
4️⃣ Credential Stuffing – Using leaked credentials
5️⃣ Hash Cracking – Cracking stored password hashes


Important Password Attack Tools in Kali Linux


1️⃣ CeWL

About

CeWL is a custom wordlist generator.

It crawls a website and collects words to create a targeted password list.

Use Case:

  • Create wordlist from company website

  • Targeted password guessing

  • Social engineering preparation

Example:

cewl http://example.com -w wordlist.txt

This generates a custom wordlist.


2️⃣ Crunch

About

Crunch generates custom wordlists based on pattern, length, and character set.

Example:

crunch 6 8 -o passwords.txt

This creates passwords between 6–8 characters.

Useful for:

  • Controlled brute-force attacks

  • Pattern-based testing


3️⃣ Hashcat

About

Hashcat is one of the most powerful password cracking tools.

It uses CPU/GPU acceleration to crack password hashes.

Capabilities:

  • Crack MD5, SHA1, SHA256

  • GPU-based cracking

  • Dictionary attacks

  • Rule-based attacks

Example:

hashcat -m 0 hash.txt wordlist.txt

Where:

  • -m 0 = MD5 hash type

Hashcat is widely used in professional security audits.


4️⃣ John the Ripper

About

John the Ripper is one of the most famous password cracking tools.

It is used to crack:

  • Linux password hashes

  • Windows SAM hashes

  • Database password hashes


Example:

john hashfile.txt

Using a wordlist:

john --wordlist=rockyou.txt hashfile.txt

John automatically detects hash type in many cases.


5️⃣ Johnny

About

Johnny is the graphical interface for John the Ripper.

It provides:

  • Easy hash loading

  • Wordlist selection

  • Visual cracking status

Useful for beginners.


6️⃣ Medusa

About

Medusa is a fast, parallel, online login brute-force tool.

It supports multiple protocols:

  • SSH

  • FTP

  • HTTP

  • SMB

  • Telnet


Example:

medusa -h 192.168.56.102 -u admin -P passwords.txt -M ssh

It attempts login via SSH using wordlist.

Medusa is commonly used in penetration testing to audit weak credentials.


7️⃣ Ncrack

About

Ncrack is developed by the Nmap team.

It focuses on network authentication cracking.

Supported Services:

  • SSH

  • RDP

  • FTP

  • Telnet

  • HTTP

Example:

ncrack -p 22 --user admin -P passwords.txt 192.168.56.102

Password Attack Workflow (Ethical Testing)

  1. Identify service (SSH, FTP, HTTP login)

  2. Check for rate limiting

  3. Prepare wordlist (CeWL / Crunch)

  4. Perform controlled testing

  5. Analyze results

  6. Recommend strong password policy


Real-World Security Testing Scenario

Suppose a company runs:

  • SSH server

  • Web admin panel

  • Database server

Password testing verifies:

  • Are default credentials active?

  • Are passwords too short?

  • Is rate limiting enabled?

  • Is account lockout configured?

Weak passwords can lead to:

  • Unauthorized access

  • Data theft

  • Full server compromise


Comparison of Major Tools

ToolTypeBest Use
CeWLWordlist GeneratorTargeted dictionary
CrunchWordlist GeneratorPattern-based passwords
HashcatHash CrackerGPU-accelerated cracking
John the RipperHash CrackerMulti-platform hash cracking
JohnnyGUIJohn interface
MedusaOnline Brute ForceMulti-protocol login testing
NcrackNetwork Login CrackerService authentication

Important Security Controls Against Password Attacks

To protect systems:

  • Use strong passwords (12+ characters)

  • Enable multi-factor authentication (MFA)

  • Implement account lockout policy

  • Use CAPTCHA on login pages

  • Enable rate limiting

  • Monitor login attempts


Legal & Ethical Warning

Password attack tools must only be used:

  • In your own lab

  • On systems you own

  • With written authorization

Unauthorized password attacks are illegal and punishable under cyber laws.

Web Application Analysis in Kali Linux – Tools, Attacks & Practical Overview


Web Application Analysis in Kali Linux – Tools, Attacks & Practical Overview

What is Web Application Analysis?

A web application is a dynamic website that interacts with users through browsers and communicates with a backend server or database.

Web Application Analysis is the process of:

  • Identifying vulnerabilities

  • Testing authentication & authorization

  • Detecting input validation flaws

  • Preventing data leakage

These tools are available in Kali Linux under:

Applications → Web Application Analysis


Common Web Application Vulnerabilities

Web applications are commonly vulnerable to:

1️⃣ SQL Injection (SQLi)

Manipulating database queries through user input.

2️⃣ Denial of Service (DoS)

Overloading the server to make it unavailable.

3️⃣ URL Manipulation

Changing parameters in URL to access unauthorized data.

4️⃣ Authentication Bypass

Weak login mechanisms.

5️⃣ Cross-Site Scripting (XSS)

Injecting malicious scripts into web pages.


Important Web Application Analysis Tools


1️⃣ Burp Suite

About

Burp Suite is one of the most powerful and widely used web application security testing tools.

It works as a proxy between browser and server.

Key Features:

  • Intercept HTTP requests

  • Modify request parameters

  • Test authentication

  • Scan for vulnerabilities


Burp Suite Interface


Image


How It Works:

  1. Configure browser proxy (127.0.0.1:8080)

  2. Enable Intercept

  3. Capture login request

  4. Modify parameters

  5. Forward request

Commonly used for:

  • SQL injection testing

  • Authentication testing

  • Session handling analysis


2️⃣ HTTrack

About

HTTrack is a website cloning tool.

It downloads complete websites locally.

Uses:

  • Analyze website structure

  • Discover hidden directories

  • Offline vulnerability assessment

Example:

httrack http://example.com

3️⃣ SQLMap

About

SQLmap is an automated SQL injection testing tool.

It detects and exploits SQL injection vulnerabilities.


Example Usage:

sqlmap -u "http://example.com/page.php?id=1" --dbs

This checks:

  • Whether parameter is injectable

  • Lists available databases


SQLMap Example Output

Image

Image


Image


4️⃣ Vega

About

Vega is a GUI-based web vulnerability scanner.

Features:

  • Detects XSS

  • Detects SQL injection

  • Scans for misconfigurations

  • Automated web crawling

It is beginner-friendly compared to manual tools.


5️⃣ WebScarab

About

WebScarab is a web proxy tool similar to Burp Suite.

Capabilities:

  • Intercept HTTP requests

  • Analyze session tokens

  • Modify parameters

  • Perform fuzzing


6️⃣ WPScan

About

WPScan is specifically designed to scan WordPress websites.

It detects:

  • Vulnerable plugins

  • Outdated themes

  • Weak passwords

  • WordPress version

Example:

wpscan --url http://example.com

7️⃣ OWASP ZAP

About

OWASP ZAP (Zed Attack Proxy) is a popular open-source web application scanner.

Features:

  • Automated scanning

  • Manual testing

  • Proxy interception

  • Vulnerability reporting


ZAP Interface Example

Image

Image

Image

Image


8️⃣ Skipfish

About

Skipfish is a fast web application security reconnaissance tool.

It performs:

  • Website crawling

  • Vulnerability mapping

  • Security testing

Example:

skipfish -o output http://example.com

Web Application Testing Workflow

  1. Identify target website

  2. Map application structure

  3. Intercept traffic (Burp / ZAP)

  4. Test parameters for injection

  5. Perform automated scanning

  6. Analyze vulnerabilities

  7. Recommend mitigation


Real-World Example

Consider an E-commerce website with payment gateway.

Web Application Analysis checks:

  • Is login secure?

  • Is payment API protected?

  • Can URL parameters be manipulated?

  • Is database query sanitized?

If input validation is weak, attackers may:

  • Extract customer data

  • Bypass authentication

  • Manipulate payment amount


Comparison of Major Tools

ToolTypeBest For
Burp SuiteProxy + ManualDeep testing
VegaGUI ScannerBeginner-friendly
WebScarabProxyManual analysis
SQLMapCLISQL injection
WPScanSpecializedWordPress security
ZAPProxy + AutoFull web scanning
SkipfishCLI ScannerFast crawling
HTTrackClonerWebsite structure

Legal & Ethical Note

Web application testing must only be done:

  • On your own lab

  • On websites you own

  • With written authorization

Unauthorized testing is illegal.

Vulnerability Analysis in Kali Linux – Tools and Practical Overview


Vulnerability Analysis in Kali Linux – Tools and Practical Overview

What is Vulnerability Analysis?

A vulnerability is a weakness in a system, application, or network that can be exploited by an attacker. Vulnerability Analysis is the process of identifying, classifying, and prioritizing these weaknesses before they are exploited.

Organizations perform vulnerability analysis to:

  • Detect security flaws

  • Prevent data breaches

  • Reduce attack surface

  • Strengthen overall system security

In penetration testing, this phase comes after Information Gathering.

In Kali Linux, these tools are available under:

Applications → Vulnerability Analysis


Types of Vulnerabilities

Vulnerabilities may include:

  • Open ports with insecure services

  • Outdated software versions

  • Misconfigured servers

  • Input validation flaws

  • Buffer overflow weaknesses

  • Web application vulnerabilities


Common Vulnerability Analysis Tools in Kali Linux


1️⃣ Bed

About Bed

Bed (Bruteforce Exploit Detector) is used to test services for buffer overflow vulnerabilities.

It sends malformed input to services to check if they crash.

Usage Example:

bed -s HTTP -t 192.168.56.102 -p 80

Purpose:

  • Detect buffer overflow

  • Test service robustness

  • Identify unstable services


2️⃣ Ohrwurm

About Ohrwurm

Ohrwurm is a SIP protocol fuzzer.

It is used to test VoIP servers for vulnerabilities in SIP implementations.

Key Use:

  • Test SIP-based communication servers

  • Detect malformed packet handling

  • Identify VoIP weaknesses

Common in telecom and VoIP security assessments.


3️⃣ Powerfuzzer

About Powerfuzzer

Powerfuzzer is a web application fuzzing tool.

It is used to:

  • Detect SQL injection

  • Test input validation

  • Identify web application vulnerabilities

Purpose:

  • Web form fuzzing

  • Automated vulnerability discovery

  • Parameter testing


4️⃣ Sfuzz

About Sfuzz

Sfuzz is a simple but powerful fuzzing tool.

It sends random or crafted data to a target application to check for crashes or abnormal behavior.

Common Use:

  • Buffer overflow testing

  • Protocol fuzzing

  • Service stability testing


5️⃣ Siparmyknife

About Siparmyknife

Siparmyknife is a SIP security testing tool.

It is used to:

  • Scan SIP servers

  • Perform SIP enumeration

  • Detect VoIP vulnerabilities

This tool is useful in:

  • Telecom infrastructure testing

  • VoIP penetration testing


6️⃣ Nikto

About Nikto

Nikto is one of the most popular web vulnerability scanners.

It scans web servers for:

  • Outdated software

  • Dangerous files

  • Misconfigurations

  • Default credentials

  • Known vulnerabilities


Example Usage:

nikto -h http://192.168.56.102

Sample Output May Reveal:

  • Server version

  • Missing security headers

  • Exposed directories

  • Known CVEs


Nikto Interface Example

Image

Image

Image

Image


Vulnerability Analysis Workflow

Step-by-step approach:

  1. Identify live hosts (using Nmap)

  2. Identify open ports

  3. Detect service versions

  4. Run vulnerability scanning tools

  5. Analyze findings

  6. Recommend mitigation

  7. Patch and retest


Difference Between Scanning and Exploitation

PhasePurpose
Information GatheringCollect data
Vulnerability AnalysisIdentify weaknesses
ExploitationUse weakness to gain access

Vulnerability analysis does not mean hacking — it means identifying and reporting weaknesses responsibly.


Real-World Example

Before releasing a new operating system, companies perform:

  • Internal security testing

  • Code review

  • Vulnerability scanning

  • Patch management

This ensures:

  • Reduced security flaws

  • Better user protection

  • Stable release


Learning Outcomes

After understanding these tools, you will:

  • Identify server misconfigurations

  • Test web applications

  • Perform fuzzing attacks in lab

  • Detect VoIP vulnerabilities

  • Analyze vulnerability scan results


Information Gathering in Kali Linux – Complete Practical Lab Guide


Information Gathering in Kali Linux – Complete Practical Lab Guide

Information Gathering is the first and most critical phase of penetration testing. Before exploiting any system, a security professional must understand:

  • What systems are running

  • Which ports are open

  • What services are exposed

  • What information is publicly available

In this blog, you will learn how to perform Information Gathering using tools available in Kali Linux.


๐Ÿ” What is Information Gathering?

Information Gathering (Reconnaissance) is the process of collecting data about a target system, network, or domain.

It is divided into:

  • Passive Reconnaissance – Collecting data without interacting directly with the target

  • Active Reconnaissance – Direct interaction with the target (e.g., port scanning)

Kali Linux provides multiple built-in tools under:

Applications → Information Gathering


๐Ÿงช Lab Setup

To perform this lab safely:

  • Attacker Machine: Kali Linux

  • Target Machine: Metasploitable 2 or Ubuntu VM

  • Network Mode: Host-Only / Internal Network

Example IP setup:

MachineIP Address
Kali192.168.56.101
Target192.168.56.102

Check IP using:

ip a

1️⃣ Nmap – Network Discovery & Port Scanning

About Nmap

Nmap is the most powerful and widely used network scanning tool.

It helps in:

  • Host discovery

  • Port scanning

  • Service detection

  • OS detection


๐Ÿ”น Basic Host Discovery

Scan entire subnet:

nmap 192.168.56.0/24

This identifies live machines.


๐Ÿ”น Port Scanning

Scan target machine:

nmap 192.168.56.102

Scan specific ports:

nmap -p 21,22,80 192.168.56.102

๐Ÿ”น Service Version Detection

nmap -sV 192.168.56.102

This reveals service versions like Apache, FTP, SSH.


๐Ÿ”น OS Detection

sudo nmap -O 192.168.56.102

Nmap attempts to identify the operating system.


2️⃣ Zenmap – GUI Version of Nmap

About Zenmap

Zenmap is the graphical interface of Nmap.

It is useful for beginners who prefer GUI over command line.


How to Use

Launch:

zenmap

Or:

Applications → Information Gathering → Zenmap

Steps:

  1. Enter Target IP

  2. Select Profile (Quick Scan / Intense Scan)

  3. Click Scan

Zenmap provides:

  • Visual output

  • Topology mapping

  • Easy report saving


3️⃣ Stealth Scan (SYN Scan)

A Stealth Scan is performed using:

sudo nmap -sS 192.168.56.102

How It Works:

  • Sends SYN packet

  • Does not complete TCP handshake

  • Harder to detect

Comparison:

nmap -sT 192.168.56.102
Scan TypeOptionDescription
TCP Connect-sTFull handshake
Stealth SYN-sSHalf-open scan

Stealth scan is commonly used during penetration testing to avoid detection.


4️⃣ Dmitry – Domain Information Gathering

About Dmitry

Dmitry is used for collecting domain-related intelligence.

It performs:

  • WHOIS lookup

  • Subdomain discovery

  • Email harvesting


Usage Example

dmitry example.com

Full scan:

dmitry -winse example.com

Options:

  • -w → WHOIS

  • -i → IP lookup

  • -n → Netcraft info

  • -s → Subdomains

  • -e → Email addresses

This tool is useful for Passive Reconnaissance.


5️⃣ Maltego – Visual OSINT Mapping

About Maltego

Maltego is an advanced OSINT tool that visually maps relationships between domains, IPs, emails, and organizations.


Image


How to Use

  1. Open Maltego

  2. Create New Graph

  3. Drag a "Domain" entity

  4. Enter target domain

  5. Run Transforms

Maltego automatically maps:

  • Domain → IP

  • Domain → DNS

  • Domain → WHOIS

This provides a visual intelligence structure.


๐Ÿ“š Key Differences Between Tools

ToolTypePurpose
NmapActivePort & service scanning
ZenmapGUIVisual Nmap scanning
Stealth ScanActiveLow-detection scanning
DmitryPassiveDomain intelligence
MaltegoPassive/OSINTRelationship mapping

๐ŸŽฏ Learning Outcome

After completing this lab, you will:

  • Understand reconnaissance methodology

  • Perform active network scanning

  • Identify open ports and services

  • Gather domain intelligence

  • Visualize OSINT data

  • Compare CLI and GUI approaches

Monday, February 23, 2026

Passive Reconnaissance Mastery Program

Tech Guardians – Cyber Range Based Course

Passive reconnaissance is the foundation of professional cybersecurity assessments. Before scanning, exploiting, or defending systems, security professionals must first understand a target’s external digital footprint.

Network Security Phase–1 by Tech Guardians is designed to build that foundation using structured, lab-based training inside a controlled cyber range.

This blog explains the step-by-step methodology, tools, and practical approach used in the course.


Why Passive Reconnaissance Matters

Passive reconnaissance allows analysts to gather intelligence without directly interacting with the target infrastructure.

This means:

  • No intrusion detection alerts

  • No logs triggered on the target

  • No direct packets sent to the organization

  • Completely OSINT-based intelligence gathering (within legal scope)

This stage identifies:

  • Domain ownership

  • Hosting infrastructure

  • Email servers

  • DNS misconfigurations

  • Exposed internet services

  • Subdomains and hidden assets


Tools Covered in Phase–1

ToolPurpose
    whois                    Domain registration intelligence
    nslookup            DNS record enumeration
    dig            Advanced DNS analysis
    DNSDumpster            Subdomain & infrastructure mapping
    Shodan.io            Internet-wide exposure intelligence

Step 1 – WHOIS Intelligence Gathering

WHOIS provides registration-level information about a domain.

Tool Used: whois

Command:

whois example.com

What It Reveals:

  • Registrar

  • Creation date

  • Expiration date

  • Name servers

  • Registrant details (if not privacy protected)

Practical Use Case:

  • Identify domain takeover risks

  • Detect expired domain vulnerabilities

  • Assess social engineering opportunities

  • Identify DNS infrastructure


Step 2 – DNS Enumeration with nslookup

DNS records expose infrastructure details.

Tool Used: nslookup


A Record (IPv4 Lookup)

nslookup -type=A example.com 1.1.1.1

Output Analysis:

  • Extract IP addresses

  • Identify hosting provider

  • Map infrastructure


MX Record (Mail Server Discovery)

nslookup -type=MX example.com

Analysis:

  • Identify mail provider (Google, Microsoft, Self-hosted)

  • Analyze email routing

  • Assess email attack surface


TXT Record (Email Security)

nslookup -type=TXT example.com

Look For:

  • SPF record

  • DKIM

  • DMARC

These protect against email spoofing and phishing attacks.


Step 3 – Advanced DNS Analysis Using dig

dig provides more technical details compared to nslookup.

Tool Used: dig


Basic A Record Query

dig example.com A

Students Analyze:

  • TTL (Time To Live)

  • Authoritative server

  • Response flags


Query Specific DNS Server

dig @1.1.1.1 example.com MX

This helps verify DNS propagation and compare results across DNS providers.


Step 4 – Subdomain Discovery

Standard DNS tools cannot automatically discover hidden subdomains.


Method 1 – Manual Google Dorking

Search:

site:example.com

This reveals indexed subdomains.


Method 2 – DNSDumpster

Image

Image


Image

What DNSDumpster Provides:

  • Subdomains

  • DNS servers

  • MX servers

  • IP addresses

  • Infrastructure graph mapping

This visual representation helps identify attack surface quickly.


Step 5 – Exposure Intelligence Using Shodan

Shodan scans the internet and indexes exposed services.

Image

Image

Image

Image

What Shodan Reveals:

  • Open ports

  • Server banners

  • Service versions

  • Hosting company

  • Geographic location

Workflow:

  1. Extract IP from A record

  2. Search IP in Shodan

  3. Identify open ports

  4. Identify exposed services

  5. Assess risk


Final Challenge – Passive Recon Report

Students perform a complete reconnaissance cycle:

  1. WHOIS analysis

  2. DNS A, MX, TXT enumeration

  3. Subdomain discovery

  4. Infrastructure mapping

  5. Shodan exposure analysis

  6. Professional reconnaissance report creation

Tuesday, February 17, 2026

Username Enumeration Using FFUF


Practical Step-by-Step Authentication Testing Guide


Introduction

Authentication mechanisms often reveal sensitive information through error messages. One common vulnerability is username enumeration, where a web application confirms whether a username exists.

In this practical exercise, we will:

  • Identify valid usernames

  • Use ffuf for automated fuzzing

  • Extract confirmed usernames

  • Create a usable list for further authentication testing

Target endpoint:

http://MACHINE_IP/customers/signup

1️⃣ Understanding the Vulnerability

Visit:

http://MACHINE_IP/customers/signup

Try registering with:

Username: admin
Email: test@test.com
Password: test123
Confirm Password: test123

If you receive:

An account with this username already exists

This confirms:

  • The username exists

  • The application leaks information

  • The system is vulnerable to username enumeration

This behavior allows attackers to build a list of valid accounts.


2️⃣ Lab Requirements

You need:

  • Kali Linux / TryHackMe AttackBox

  • ffuf installed

  • SecLists wordlist

Check if ffuf is installed:

ffuf -h

If not installed:

sudo apt install ffuf

Install SecLists if needed:

sudo apt install seclists

Wordlist path:

/usr/share/wordlists/SecLists/Usernames/Names/names.txt

3️⃣ Crafting the FFUF Command

We will send POST requests to the signup form.

Full Command:

ffuf -w /usr/share/wordlists/SecLists/Usernames/Names/names.txt \
-X POST \
-d "username=FUZZ&email=test@test.com&password=test123&cpassword=test123" \
-H "Content-Type: application/x-www-form-urlencoded" \
-u http://MACHINE_IP/customers/signup \
-mr "username already exists"

4️⃣ Breaking Down the Command

ParameterPurpose
-wWordlist location
-X POSTUse POST request
-dData sent in form
FUZZReplaced by each username
-HHeader for form submission
-uTarget URL
-mrMatch response containing text

The keyword FUZZ is replaced automatically by each entry from the wordlist.


5️⃣ Running the Attack

Execute the command.

ffuf will:

  • Send thousands of POST requests

  • Insert each username into the form

  • Check responses

  • Display only matches containing:

username already exists

6️⃣ Interpreting Results

Example output:

admin
john
michael
david

These usernames exist in the system.

Only those displayed by ffuf are valid.


7️⃣ Creating valid_usernames.txt

Now create a file:

nano valid_usernames.txt

Add discovered usernames:

admin
john
michael
david

Save the file.

Verify:

cat valid_usernames.txt

8️⃣ Automating Output Saving (Optional)

Instead of copying manually:

ffuf -w /usr/share/wordlists/SecLists/Usernames/Names/names.txt \
-X POST \
-d "username=FUZZ&email=test@test.com&password=test123&cpassword=test123" \
-H "Content-Type: application/x-www-form-urlencoded" \
-u http://MACHINE_IP/customers/signup \
-mr "username already exists" \
-of csv -o results.csv

Then extract usernames from results.csv.


9️⃣ Why This Attack Works

The flaw exists because:

  • The application distinguishes between:

    • Existing username

    • New username

  • It provides different error messages

Secure applications should respond with:

Registration failed

Without revealing if the username exists.


๐Ÿ” Security Mitigation

Developers should:

  • Use generic error messages

  • Implement rate limiting

  • Add CAPTCHA

  • Log suspicious repeated attempts


๐ŸŽฏ Final Outcome

At the end of this exercise, you should have:

valid_usernames.txt

Containing confirmed usernames for:

  • Password brute forcing

  • Credential stuffing

  • Further authentication testing


Educational Purpose Notice

This exercise must only be performed:

  • In lab environments

  • On machines you are authorized to test

  • In platforms like TryHackMe or HackTheBox

Unauthorized testing is illegal.

ETHICAL HACKING LEVEL-1


๐ŸŸข LEVEL 1 – FOUNDATION PACK (15 Days)

Tech Guardians – By RJ Nehra
Goal: Build Strong Cyber, Networking & Lab Foundation
Mode: 60% Practical | 40% Theory
Platform: Kali Linux + TryHackMe (Paid Subscription)


๐Ÿ“˜ MODULE 1: Cyber Security Fundamentals

1️⃣ What is Cyber Security?

Cyber Security = Protecting systems, networks, and data from attacks.

๐Ÿ”บ CIA Triad

  • Confidentiality – Prevent unauthorized access
    Example: Password-protected admin panel

  • Integrity – Prevent data tampering
    Example: File hash verification

  • Availability – Ensure service uptime
    Example: DDoS protection


2️⃣ Types of Hackers

  • White Hat (Ethical)

  • Black Hat

  • Grey Hat

  • Script Kiddie

  • Insider Threat


3️⃣ Ethical Boundaries (Very Important)

You must:

  • Practice only in lab

  • Use TryHackMe rooms

  • Never attack real websites

  • Use written permission in real cases


๐Ÿ”ฅ TryHackMe Practical (Day 1–2)

Rooms to Complete:

  • “Introduction to Cyber Security”

  • “Pre Security Path – What is Networking?”

  • “Careers in Cyber”

These build conceptual clarity.


๐Ÿ“˜ MODULE 2: Networking Fundamentals

If networking is weak → hacking will be weak.


1️⃣ OSI Model (7 Layers)

  1. Physical

  2. Data Link

  3. Network

  4. Transport

  5. Session

  6. Presentation

  7. Application

Example:

When you open website:

Application → HTTP
Transport → TCP
Network → IP
Data Link → MAC


2️⃣ TCP vs UDP

TCP     UDP
Reliable Fast
Handshake                           No Handshake
Used in HTTPUsed in DNS

3️⃣ Ports & Protocols

Common Ports:

PortService
21FTP
22SSH
80HTTP
443HTTPS
445SMB
3389RDP

๐Ÿ”ฅ Practical in Kali

Commands:

ip a
ifconfig
netstat -tulnp
ss -tuln
ping <ip>
traceroute <ip>

๐Ÿ”ฅ TryHackMe Rooms (Day 3–5)

  • “Network Fundamentals”

  • “What is DNS?”

  • “Intro to LAN”

Goal:
Understand:

  • IP Address

  • Subnet

  • Gateway

  • DNS resolution


๐Ÿ“˜ MODULE 3: Linux for Hackers

Most hacking tools run on Linux.


1️⃣ Linux File Structure

/root
/home
/etc
/var
/usr

Example:

  • Password configs stored in /etc


2️⃣ Basic Commands

ls
cd
pwd
cat
nano
touch
mkdir
rm
chmod
chown
grep
find

3️⃣ File Permissions

Format:

rwx r-x r--

Example:

chmod 777 file.txt

Meaning:
Full access to everyone.


๐Ÿ”ฅ Practical Task

Create user:

adduser testuser

Change permission:

chmod 600 secret.txt

Check running services:

ps aux
top

๐Ÿ”ฅ TryHackMe Rooms (Day 6–8)

  • “Linux Fundamentals Part 1”

  • “Linux Fundamentals Part 2”

  • “Linux Fundamentals Part 3”

These are excellent for beginners.


๐Ÿ“˜ MODULE 4: Lab Setup (Very Important)

You will create Attacker + Victim Lab.


๐Ÿ”ง Architecture

Image

Image

Image

Image


Setup Steps

  1. Install VirtualBox / VMware

  2. Install Kali Linux

  3. Install Metasploitable

  4. Set both machines to Internal Network

  5. Assign IP addresses

  6. Test connectivity

Test:

ping <victim-ip>

Snapshot Concept

Before attack:
→ Take snapshot
If system breaks → Restore

Very important for beginners.


๐Ÿ”ฅ TryHackMe Practical (Day 9–12)

Rooms:

  • “Intro to Offensive Security”

  • “Nmap”

  • “Basic Pentesting”

These simulate real lab safely.


๐Ÿ“˜ MODULE 5: Basic Scanning (Nmap Introduction)


1️⃣ What is Nmap?

Network mapper tool to scan ports and services.


Basic Scan

nmap <target-ip>

Find open ports.


Service Detection

nmap -sV <target-ip>

OS Detection

nmap -O <target-ip>

Example Scenario

You scan:

nmap -sV 192.168.1.10

Output shows:
Port 21 open → FTP
Port 22 open → SSH
Port 80 open → Apache 2.4

Now you know:
Target running web server + FTP.

This is reconnaissance.


๐Ÿ”ฅ TryHackMe Room (Day 13–15)

  • “Nmap”

  • “Vulnversity” (Beginner friendly)

  • “Basic Pentesting”

Goal:

  • Scan machine

  • Identify services

  • Capture screenshots

  • Write basic findings


๐ŸŽฏ END OF LEVEL 1 – STUDENT SHOULD BE ABLE TO:

✔ Setup personal hacking lab
✔ Understand networking
✔ Use Linux comfortably
✔ Perform Nmap scanning
✔ Understand attack lifecycle
✔ Practice safely using TryHackMe


๐Ÿ“Œ Assignment for Level 1 Completion

  1. Setup Kali + Metasploitable

  2. Scan victim machine

  3. Identify open ports

  4. Write small 1-page report including:

    • IP

    • Open ports

    • Services

    • Risk explanation